Marine AIS
Automatic Identification System software add-on

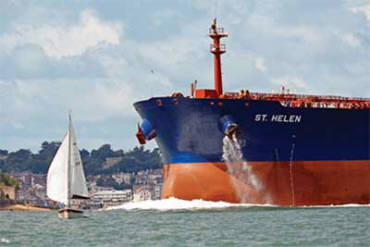
Have you ever looked around, at sea, and been startled by the sight of a ship close by, and bearing down on you? Modern ships travel fast, and unless you keep a very vigilant lookout, they can appear out of nowhere!
AIS (Automatic Identification System) is a system of VHF transponders carried by commercial ships and some smaller vessels. It works by, sending and receiving vessel speed, heading, position, rate of turn, and identification data over VHF radio. This can then be plotted by Memory-Map on the digital chart. Add in your own GPS information and you’ll see all ship movements relative to your position and be alerted of a potential collision or near miss.
AIS Features

- See ships plotted on the chart.
- Audible collision alert.
- Find the ship’s name, radio call-sign, size, type of ship, size, rate of turn, destination port and ETA.
- Velocity vector shows ship’s course and speed over ground on the chart.
- When a ship provides rate-of-turn, velocity vectors are shown curved to predict the path of the ship (PC only).
- Table showing all ships sorted by name, distance, bearing, closest point of approach, or time to closest point of approach.
- Ships are color coded to show status and possible collision
- Shows class A (commercial ships) and class B (voluntary) AIS transponders..
- Support for DSC radio (Position reports / Distress locations plotted).
- NMEA-0183 output for Autopilot when following route.
- Works on a Windows PC, iOS, Android and Mac.
AIS Targets List
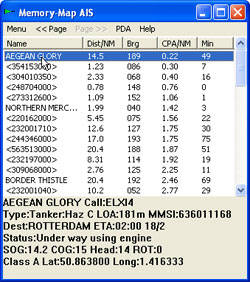
In the AIS application, you can view a list of all current targets, with their distance and bearing from your current position, and the distance and time of the closest point of approach.
You can sort the targets by clicking on the header of any column.
Clicking on a target shows you the full details in the area at the bottom of the window.
If the target is moving away from you, the CPA distance and time are blank.
AIS Targets on the Chart
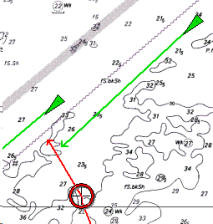
The AIS targets are shown on the chart as animated icons. Each vessel is shown as a triangle, oriented according to its compass heading.
Each moving target has a velocity vector that shows its course and speed over the ground. All the velocity vectors are drawn on the same time scale, so you can judge the relative speed of different targets. You can determine, for example whether you will pass ahead or astern of a ship by looking at the heads of the velocity vectors
For example, in this situation, you will pass close ahead of the first ship, and well behind the second one.
The ship colors are as follows:
Targets with status “Moored” or “Anchored” are shown in grey.
- Targets with a status “Restricted Maneuverability”, “Constrained by draft”, or “Aground” are shown in purple.
- Targets “Under way using motor” are green.
- Targets “Under way Sailing” are blue.
- Targets on a collision course are red.
- Targets nearly on collision course are yellow.
- If no transmission has been heard from a target in the last 4 minutes, it is white.
If you have the “Data” button enabled, tapping, or hovering with
the mouse will show the pop-up data on the target.

The software uses the course and speed of each target and your own course and speed to calculate your closest point of approach. If this is less than a given threshold, a warning is given. When you are on a collision course, the device will beep and the collision targets are shown in red.
Targets near the threshold are shown in yellow.
You can adjust the closest point of approach threshold, in terms of time and distance in the Settings menu. Targets that will pass closer than the specified distance, and within the specified time, are considered dangerous. These cause the beep and red target color. The time and distance thresholds are both doubled for the yellow warning targets.
Note that the size of each ship (LOA) is added to the threshold, so you will still get some alarms if you set the distance to zero. If you want to disable the collision detection feature, set the time to zero instead, or just disable the beep.
Technical Details
Hardware
You can run a simulated demo on your PC, without any additional hardware.
To receive and decode the AIS signals, you need an AIS receiver that outputs the AIVDM sentence on an NMEA or RS232 output. You also need a GPS to provide your own position, course and speed.
Some examples of compatible AIS receivers are:
We suggest you connect your GPS to the input of the receiver, or use a transponder with built-in GPS. This provides the GPS data (RMC sentences) combined with the AIS data on the output.
Alternatively, you can connect the AIS and GPS to a PC on separate serial ports. You could also connect the AIS, GPS and other instruments via a multiplexor with AIS input capability (eg, MiniPlex-Lite). Note that you cannot use a regular NMEA multiplexor, because the AIS receiver typically outputs at 38400 baud, whereas other instruments use 4800 baud.
You can also consider using a bluetooth serial adaptor. This will allow you to use a Android device with a wireless connection within about 30 ft on the boat.
iOS, Android and Mac
Full AIS functionality is built-in to the Memory-Map apps for iOS, Android and Mac. Simply connect to the data source using the GPS settings dialog. When prompted, activate the Professional license (or activate a time-limited evaluation license). The AIS Settings dialog is hidden from view until you have successfully connected to AIS data.
PC Software Download
PocketAIS runs on Windows 7, 8 or 10. You need to activate the Professional features but you may have a demo period to try it out.
Important: See this support article for important information about using AIS with Memory-Map on the PC.
To get started on the PC you need to download two files: the latest version of Memory-Map Navigator if you don’t already have it, and the AIS add-on from the Download Page.
Installation First install Memory-Map Navigator. Install some charts, and set up your GPS. Activate the Professional features in Help > License Management. Then install the PocketAIS add-on.
PC Setup
GPS and AIS on the same COM port
If you have Memory Map Navigator or Pocket Navigator configured to use the same com port (as PocketAIS), you will need to disable it: go to the GPS Setup dialog and select “None” for the manufacturer.
In the AIS application, click Menu / Connect. Select the com port on which the AIS data is received, and set the baud rate (typically 38400 for AIS). The AIS application will pass the GPS information over to Memory-Map, so you will see your position on the map, even though the GPS is set to None.
GPS and AIS on separate COM ports.
Setup Memory-Map Navigator or Pocket Nav to use the GPS, as normal.
In the AIS application, click Menu / Connect. Select the com port on which the AIS data is received, and set the baud rate (typically 38400 for AIS). The AIS application will obtain GPS information from Memory-Map.
Demo Setup with no AIS receiver or GPS
Having downloaded the software and activated the demo of Professional features you are ready to try it out.
Tap Menu / Connect, Check “Simulation”, and click the Browse (…) button. Browse in one of the sample data txt files.
You should see targets listed in the AIS application. You don’t yet have an own-ship GPS position, so the Dist, Bearing, Closest Point of Approach and Time of CPA are all blank.
Switch to MMNav to see the targets on the map.
Draw a track crossing the path of some ships, right-click > Operations > GPS Demo (or use the interactive GPS simulator on the PC). Switch back to PocketAIS, and (as the targets get updated) you will see the other data filled in.
Maneuver the simulation to put yourself on a collision course to experiment with the collision alarm.
The Dover samples are only a few minutes worth of data – so the ships keep jumping back when the file loops.
Diagnostics
If you want to see, and record, the raw data coming from the AIS, proceed as follows.
-> Click Menu / Pages
-> Click Add
-> Select “NMEA Data Stream” and click OK
If data is being received, you should see it scrolling up the window now.
To record the data to a file, click Menu / Log file… and enter the name of a txt file the raw data should be written to. To stop data capture, click Menu / Log file and Cancel. The captured log file can be used as a simulation input to replay the data.
To see the decoded AIS messages:
-> Click Menu / Pages
-> Click Add
-> Select ” AIS Data Stream” and click OK
Again, if data is being received, you should see it scrolling up the window now. You can capture a log file in the same way, but this data cannot be used as a simulation input.
When you have added these data “pages”, you can toggle between them, and the original target list with the < > buttons